Deploy services with Docker Compose and Tailscale as sidecar.
A guide on how I deploy Docker Compose services with Tailscale as a sidecar.
In this post, I will guide you through the process of deploying services using Docker Compose with Tailscale running as a sidecar container. This setup allows you to securely access your services over the Internet through Tailscale’s VPN capabilities.
Introduction
When I thought about buying a Raspberry Pi, I wanted to use it as a home server to host various services. This made me think about how to access those services remotely. After some research, I found Tailscale, a VPN solution that allows secure access to devices over the Internet.
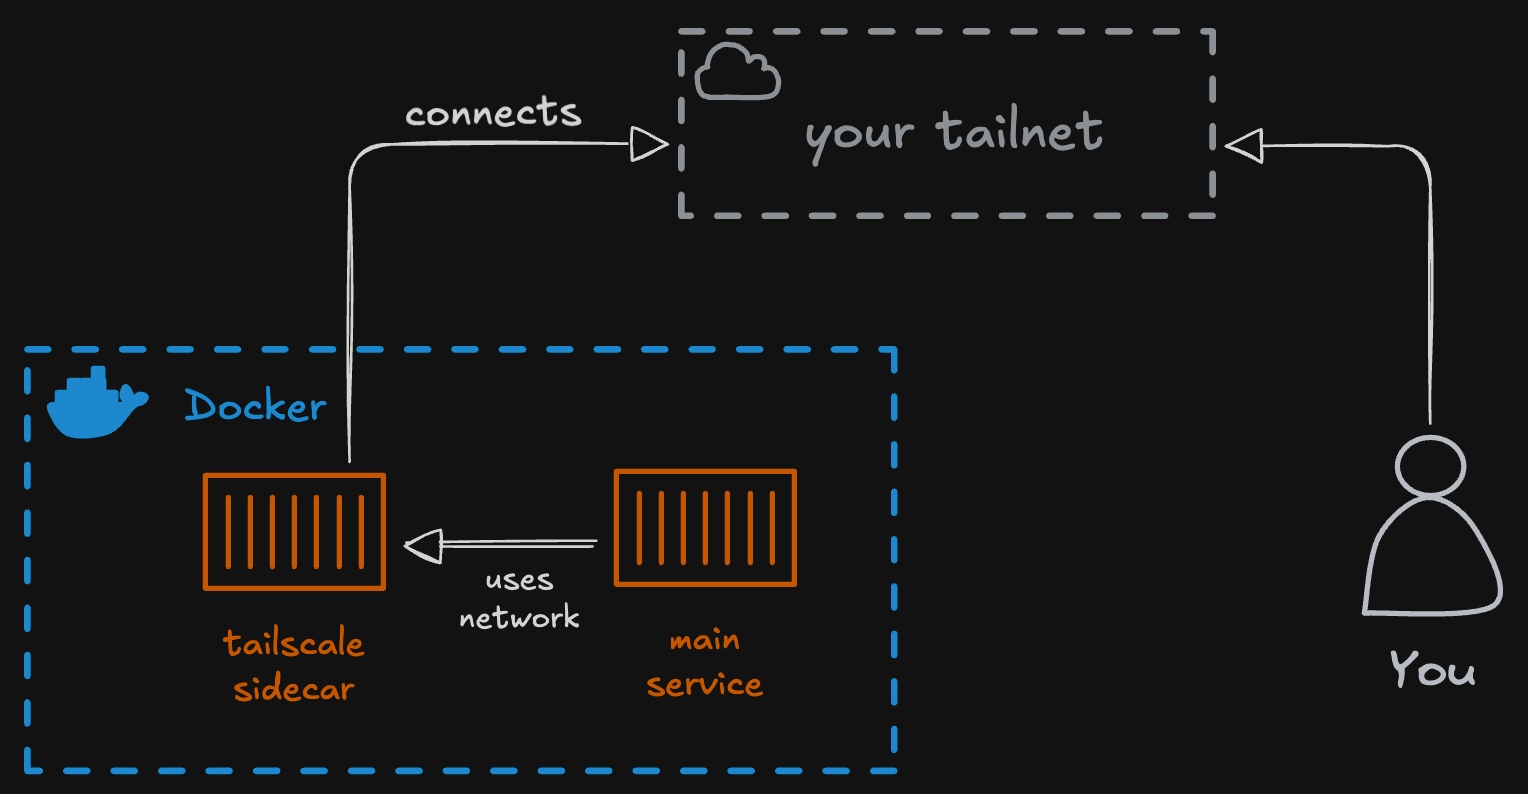
Tailscale lets you have your own private network, known as a tailnet, where all your devices can communicate securely. This is perfect for my use case, as I want to access my Raspberry Pi services from anywhere without exposing them directly to the Internet.
I already knew that I would use Docker Compose to manage my services, so the challenge was how to integrate Tailscale with Docker Compose.
In this post, I will share how I set up Tailscale as a sidecar container alongside my Docker Compose services on my Raspberry Pi.
Prerequisites
Before we start, make sure you have the following:
- A machine with Docker and Docker Compose installed.
- A Tailscale account.
Step 1: Configure the Tailscale account
I assume you already have a Tailscale account and have installed Tailscale on at least two devices to set up your tailnet.
- Enable HTTPS.
- Enable MagicDNS.
- Give your Tailnet a name.
- Create tags. I personally have created two tags:
tag:privateandtag:shared. These, with the correct policies, help me manage access to my services. - Create an OAuth Trust Credential. This is necessary to allow the Tailscale sidecar to authenticate with your Tailscale account. Save the secret for later.
I’ve created the credential with all the scopes enabled. This may not be the best practice, but I wasn’t able to make it work with more restrictive scopes.
Step 2: Create the Docker Compose file
For this example, I’m going to show how to deploy Vaultwarden with Tailscale as a sidecar container.
1
2
3
4
5
6
7
8
9
10
11
12
13
14
15
16
17
18
19
20
21
22
23
24
25
26
27
28
29
30
31
32
services:
  vaultwarden-ts:
    image: tailscale/tailscale:latest
    hostname: vaultwarden
    container_name: vaultwarden-ts
    environment:
      - TS_AUTHKEY=${TAILSCALE_AUTH_KEY}
      - TS_STATE_DIR=/var/lib/tailscale
      - TS_USERSPACE=false
      - TS_SERVE_CONFIG=/config/https.json
      - "TS_EXTRA_ARGS=--advertise-tags=tag:private --reset"
    cap_add:
      - net_admin
      - sys_module
    volumes:
      - ${PWD}/tailscale:/config
      - /dev/net/tun:/dev/net/tun
      - vaultwarden-ts:/var/lib/tailscale

  vaultwarden:
    image: vaultwarden/server:latest
    container_name: vaultwarden
    restart: unless-stopped
    environment:
      DOMAIN: ${VAULTWARDEN_DOMAIN}
    volumes:
      - vaultwarden-data:/data/
    network_mode: service:vaultwarden-ts

volumes:
  vaultwarden-ts:
  vaultwarden-data:
Let’s break down the important parts of this configuration:
- Tailscale Service: The
vaultwarden-tsservice uses the official Tailscale Docker image. It sets up Tailscale with the necessary environment variables, including the authentication key and tags.hostname: This sets the name for the Tailscale node. This is what you’ll see in your Tailscale Machines.- Environment variables:
TS_AUTHKEY: This should be set to the OAuth Trust Credential secret you created earlier.TS_STATE_DIR: Directory where the state oftailscaledis stored.TS_USERSPACE: Set tofalseto use kernel networking.TS_SERVE_CONFIG: We configure the Tailscale service with this file.TS_EXTRA_ARGS: Here, I advertise thetag:privatetag to this service.
cap_add: These capabilities are necessary for Tailscale to manage networking.volumes: We mount volumes to persist Tailscale state and allow access to the TUN device.
- Vaultwarden Service: The service configuration for the Vaultwarden application.
restart: Ensures the service restarts unless stopped manually.DOMAINenv variable: Sets the domain for Vaultwarden.Make sure that the value for
DOMAINmatches:https://<vaultwarden-ts-hostname>.<your-tailnet>.ts.netnetwork_mode: This is set toservice:vaultwarden-ts, which means that Vaultwarden shares the network namespace with the Tailscale container. To Tailscale, Vaultwarden appears to be running on localhost (127.0.0.1), simplifying the proxy configuration.
Step 3: Create the Tailscale configuration file
Create a file named https.json inside the path that is mounted to /config in the Tailscale container. This file will define how Tailscale routes traffic to the Vaultwarden service.
1
2
3
4
5
6
7
8
9
10
11
12
13
14
15
16
17
18
19
{
    "TCP": {
        "443": {
            "HTTPS": true
        }
    },
    "Web": {
        "${TS_CERT_DOMAIN}:443": {
            "Handlers": {
                "/": {
                    "Proxy": "http://127.0.0.1:80"
                }
            }
        }
    },
    "AllowFunnel": {
        "${TS_CERT_DOMAIN}:443": false
    }
}
The previous configuration does the following:
- Enables HTTPS on port 443.
- Sets up a web handler that proxies requests to the Vaultwarden service running on port 80
- Disables Tailscale Funnel for this service.
Make sure that the port specified in the
Proxyfield matches the one used by your service.
Step 4: Set environment variables
Before running the Docker Compose file, make sure to set the necessary environment variables. You can do this by creating a .env file in the same directory as your docker-compose.yaml file.
TAILSCALE_AUTH_KEY=tskey-client-***
VAULTWARDEN_DOMAIN="https://vaultwarden.<your-tailnet>.ts.net"
Step 5: Deploy the services
Now you can deploy your services using Docker Compose. Run the following command in the directory where your docker-compose.yaml file is located:
1
docker compose up -d
This command will start both the Tailscale sidecar container and the Vaultwarden service. You can check the status of your containers with:
1
docker ps
And check the logs of the Tailscale container to ensure it’s running correctly:
1
docker compose logs vaultwarden-ts
Final step
Once the containers are up and running, you should see the new node in your Tailscale admin console. You can now access Vaultwarden securely over Tailscale using the domain you specified.
Vaultwarden needs to be accessed via HTTPS, so make sure to use the correct URL.
Conclusion
This is the basic setup for deploying services with Docker Compose and Tailscale as a sidecar container. You can replicate this setup for other services by following the same pattern, adjusting the service configuration as needed.
I hope this guide helps you! If you have any questions or run into any issues, feel free to leave a comment below. Happy deploying!