Use Tangled on a Raspberry Pi as a secondary Git remote
How I keep GitHub as my main Git server and use Tangled on my Raspberry Pi as an extra push target.
Overview
For some time I wanted to keep a self-hosted copy of my repositories at home, but without changing too much of my normal workflow.
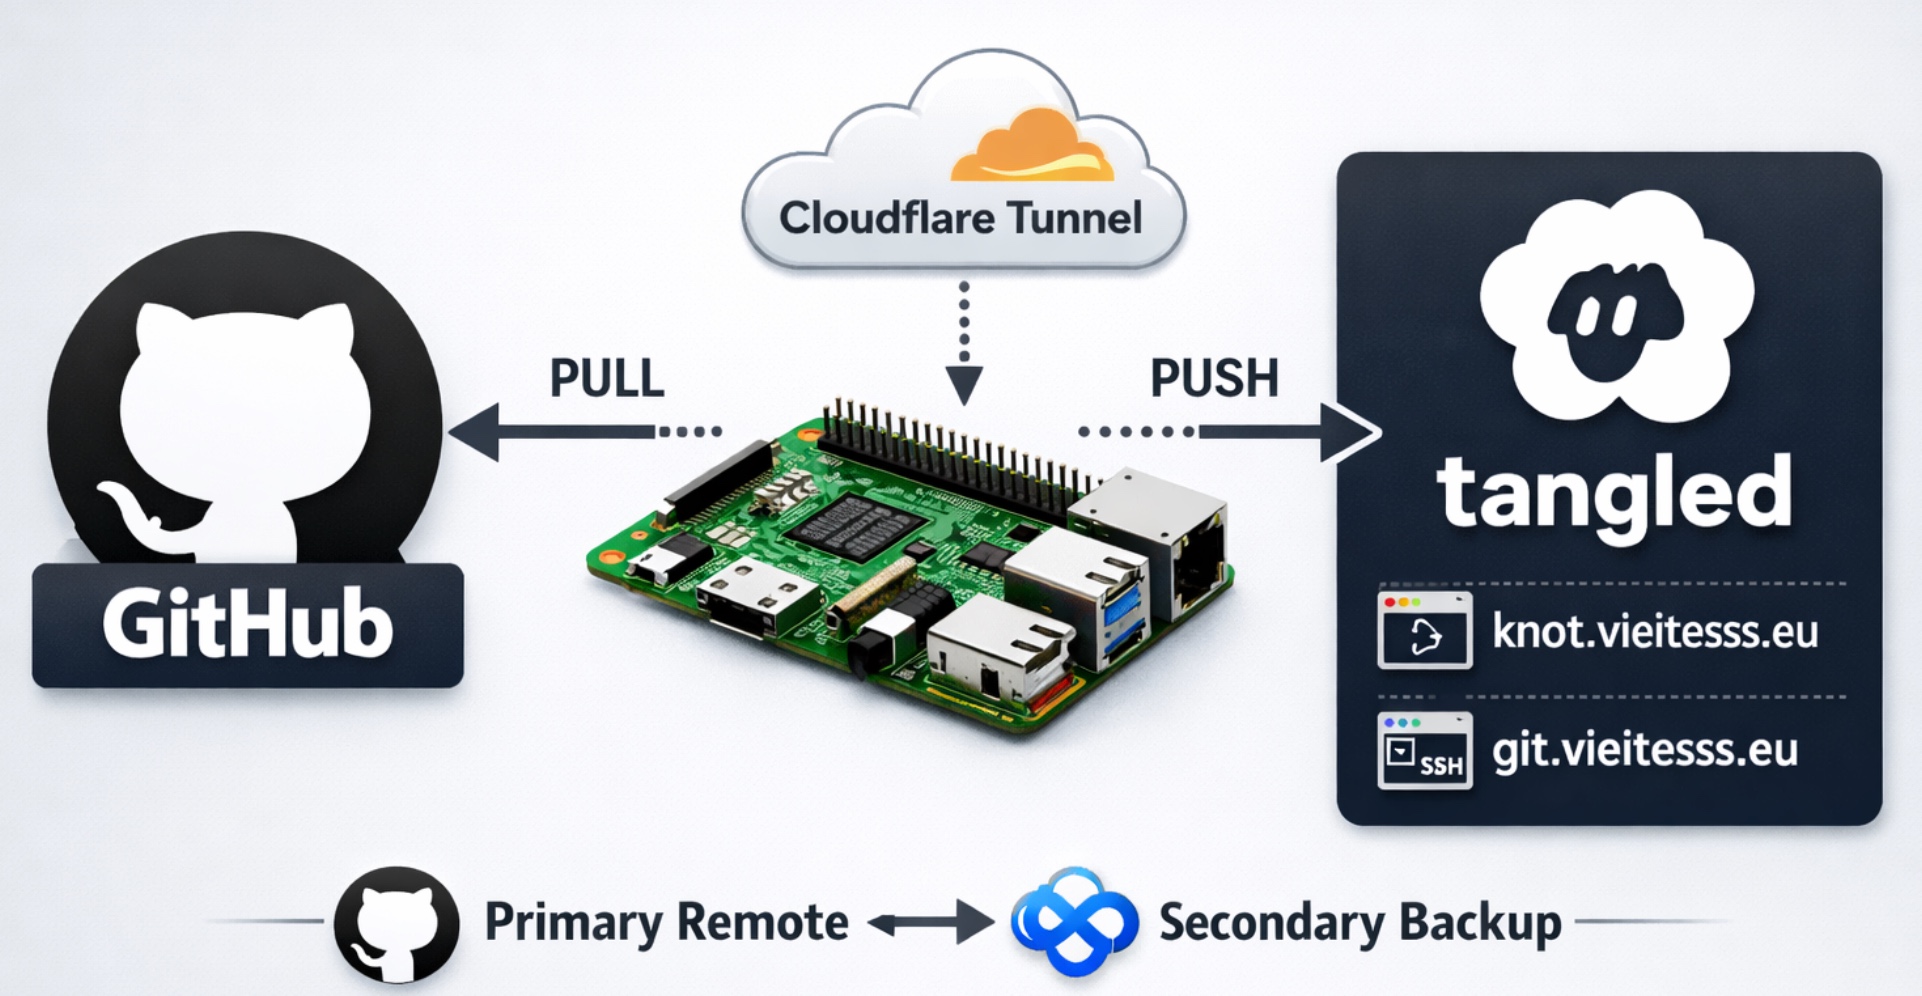
I still use GitHub as my main Git server. It is where I pull from, where I collaborate, and where I keep the public version of my repositories. What I wanted from Tangled was something different: a second place where my repositories are also pushed, running on my own Raspberry Pi.
In Tangled terms, the self-hosted server component is called Knot. That is the piece I am running at home.
This means that my final workflow looks like this:
- GitHub is still
pushandpull. - Tangled is only an extra
pushtarget. knot.vieitesss.euis the web interface of my self-hosted Knot.git.vieitesss.euis the SSH endpoint I use to push through Cloudflare Tunnel.vieitesss.euis my handle inside the Tangled network.
This is not a GitHub replacement for me. I wanted the convenience of GitHub and, at the same time, a copy of my repositories on hardware I control.
If you want the same kind of setup, this is how I made it work.
Why I wanted this setup
There are already many ways to mirror a Git repository, but I liked the idea of using Tangled because it gives me a self-hosted Git server that still fits into the Tangled ecosystem.
I also wanted to avoid exposing ports directly on my router. So the final idea was simple:
- Run Knot on the Raspberry Pi.
- Put Cloudflare Tunnel in front of it.
- Keep GitHub as
originfor fetching. - Add Tangled as an extra
pushurl.
The change in my daily workflow is small, and that is exactly why I like it. I can keep using git pull and git push almost exactly as before.
Prerequisites
Before starting, this is what I already had:
- A Raspberry Pi with SSH access.
- A domain name. In my case,
vieitesss.eu. - A Cloudflare account.
- A Tangled account and access to the self-hosting documentation.
cloudflaredinstalled on the Raspberry Pi.cloudflaredinstalled on my Mac.- At least one SSH key added to Tangled, so Git pushes can authenticate.
Step 1: Move the domain to Cloudflare
The first part was not Tangled itself. It was the domain.
I bought vieitesss.eu on Hostinger, but I moved the DNS management to Cloudflare. To do that, I added the domain to Cloudflare and then changed the nameservers in Hostinger so they pointed to Cloudflare, following Hostinger’s guide on how to change nameservers.
I did this because I wanted two things from Cloudflare:
- Easy DNS management.
- Cloudflare Tunnel, so I could expose services from the Raspberry Pi without opening ports on my router.
Once the nameserver change propagated, Cloudflare became the place where I managed all the DNS records for this setup.
Step 2: Install Knot on the Raspberry Pi
For the Knot installation itself, I followed the official Knot self-hosting guide to register the node and generate the required secrets. I am not going to repeat those steps here because the docs already do that well.
What is more useful here is the final .knot.env file, because that is what made the setup easier to understand for me:
T_REPO_SCAN_PATH=/home/git
KNOT_SERVER_HOSTNAME=knot.vieitesss.eu
APPVIEW_ENDPOINT=https://tangled.org
KNOT_SERVER_OWNER=did:plc:<your-id>
KNOT_SERVER_INTERNAL_LISTEN_ADDR=127.0.0.1:5444
KNOT_SERVER_LISTEN_ADDR=127.0.0.1:5555
The important parts are:
T_REPO_SCAN_PATH: where Knot scans repositories on disk.KNOT_SERVER_HOSTNAME: the public hostname used by the Knot web application.APPVIEW_ENDPOINT: I use the hosted Tangled appview.KNOT_SERVER_INTERNAL_LISTEN_ADDRandKNOT_SERVER_LISTEN_ADDR: both stay on127.0.0.1, because I let Cloudflare Tunnel handle the public traffic.
Keeping Knot bound to localhost was important for me. It means the Raspberry Pi does not need to expose the web service directly to the Internet.
Step 3: Verify the domain as your handle
One of the nicest parts of this setup is that I can use my own domain as my identity inside Tangled.
To do that, I added a TXT record in Cloudflare. The official AT Protocol handle specification explains this verification method in more detail:
- Name:
_atproto - Value:
did=did:plc:<your-id>
After that, I went into the Tangled settings and verified the domain. Once that worked, my handle became vieitesss.eu instead of the default generated one.
The public handle and the Knot hostname do not need to be the same thing. In my case, the server is exposed as
knot.vieitesss.eu, while my Tangled handle isvieitesss.eu.
This distinction confused me a bit at first, so it is worth calling out clearly.
Step 4: Expose Knot and Git with Cloudflare Tunnel
This is where the whole setup started to feel really clean.
Instead of opening ports in the router, I installed cloudflared on the Raspberry Pi, authenticated it, created a tunnel and configured two hostnames.
If you have never used it before, the official Cloudflare Tunnel documentation is a good starting point:
- One for the Knot web interface.
- One for Git over SSH.
The first commands I ran were these:
1
2
cloudflared tunnel login
cloudflared tunnel create <tunnel-name>
Cloudflare documents these steps in their guide for creating a locally-managed tunnel.
The login command opens the browser so you can authorize the machine in Cloudflare. It also creates ~/.cloudflared/cert.pem.
The create command creates the tunnel, gives you a tunnel UUID, and writes the credentials file to ~/.cloudflared/<tunnel-uuid>.json.
If you run these commands as
root, then~/.cloudflared/will usually be/root/.cloudflared/.
One detail that is easy to miss is that config.yml is not created automatically. You write that file yourself.
In my case, I wanted the final service configuration under /etc/cloudflared/, so I moved the tunnel credentials there and created the config file in that directory:
1
2
3
sudo mkdir -p /etc/cloudflared
sudo mv ~/.cloudflared/<tunnel-uuid>.json /etc/cloudflared/
sudoedit /etc/cloudflared/config.yml
Cloudflare documents the supported configuration file locations. You can keep the file inside ~/.cloudflared/config.yml and point the service to it explicitly, but I preferred using /etc/cloudflared/config.yml because it is a clearer system-wide location.
Replace
<tunnel-name>with whatever name you want to give to your tunnel. I prefer using a simple name related to the service.
My /etc/cloudflared/config.yml looks like this:
1
2
3
4
5
6
7
8
9
10
11
tunnel: <tunnel-uuid>
credentials-file: /etc/cloudflared/<tunnel-uuid>.json

ingress:
  - hostname: knot.vieitesss.eu
    service: http://localhost:5555
    originRequest:
      httpHostHeader: knot.vieitesss.eu
  - hostname: git.vieitesss.eu
    service: ssh://localhost:<ssh-port>
  - service: http_status:404
Replace
<ssh-port>with the SSH port of your Raspberry Pi. If you use the default SSH configuration, that will usually be22.
There are two important details here.
First, the rule for knot.vieitesss.eu forwards HTTP traffic to localhost:5555, which is where Knot listens.
Second, the rule for git.vieitesss.eu forwards SSH traffic to localhost:<ssh-port>, which is the SSH service running on the Raspberry Pi.
The line that really saved me here was this one:
1
2
originRequest:
  httpHostHeader: knot.vieitesss.eu
Without that header override, I was getting authentication and XRPC-related issues when Knot talked to the rest of the Tangled infrastructure.
If the web UI loads but some Tangled actions fail in strange ways, check the
httpHostHeaderfirst. In my case, it was required.
Once the tunnel was configured, I created the DNS routes in Cloudflare for both knot.vieitesss.eu and git.vieitesss.eu:
1
2
cloudflared tunnel route dns <tunnel-name> knot.vieitesss.eu
cloudflared tunnel route dns <tunnel-name> git.vieitesss.eu
After that, I enabled the tunnel as a system service on the Raspberry Pi, following Cloudflare’s guide for running cloudflared as a Linux service.
At that point, the Raspberry Pi was reachable from the outside, but still without exposing router ports manually.
Step 5: Configure SSH and Git on the Raspberry Pi
The Raspberry Pi also needs to be able to push to both GitHub and the local Knot instance.
In my case, I reused an SSH key I already had for GitHub and uploaded its public key to Tangled as well.
This is the relevant part of my Raspberry Pi ~/.ssh/config:
1
2
3
4
5
6
7
8
9
Host github.com
  AddKeysToAgent yes
  IdentityFile ~/.ssh/<your-key>

Host local-knot
  Hostname 127.0.0.1
  Port <ssh-port>
  User git
  IdentityFile ~/.ssh/<your-key>
The local-knot alias is just a convenience name for the local SSH endpoint I use to reach the Git repositories served on the Raspberry Pi.
Then, inside the Git repository, I configured the remote so GitHub stays as the fetch remote, but pushes go to both places:
1
2
3
git remote set-url origin git@github.com:vieitesss/k8s-d2.git
git remote set-url --add --push origin git@github.com:vieitesss/k8s-d2.git
git remote set-url --add --push origin local-knot:vieitesss.eu/k8s-d2
After that, git remote -v looks like this:
1
2
3
origin  git@github.com:vieitesss/k8s-d2.git (fetch)
origin  git@github.com:vieitesss/k8s-d2.git (push)
origin  local-knot:vieitesss.eu/k8s-d2 (push)
This is the key idea of the whole setup.
- Fetching still uses GitHub.
- Pushing uses both GitHub and Tangled.
Step 6: Configure SSH and Git on the Mac
The Raspberry Pi part was not enough. I also wanted to keep coding from my Mac and push to the Raspberry Pi through the tunnel.
For that, I installed cloudflared locally:
1
brew install cloudflared
Then I added this block to my Mac ~/.ssh/config:
1
2
3
4
Host git.vieitesss.eu
  User git
  IdentityFile ~/.ssh/<your-key>
  ProxyCommand cloudflared access ssh --hostname %h
The important line is the ProxyCommand. It wraps the SSH connection through Cloudflare, so I can use a normal Git SSH URL without opening the Raspberry Pi SSH port to the Internet. Cloudflare documents this exact pattern in their guide for SSH with cloudflared authentication.
The SSH key file on your Mac does not need to have the same name as the one on the Raspberry Pi. The important part is that the public key used there is also registered in Tangled.
Then I configured the repository remote on my Mac like this:
1
2
3
git remote set-url origin git@github.com:vieitesss/k8s-d2
git remote set-url --add --push origin git@github.com:vieitesss/k8s-d2.git
git remote set-url --add --push origin git@git.vieitesss.eu:vieitesss.eu/k8s-d2
And now git remote -v looks like this:
1
2
3
origin  git@github.com:vieitesss/k8s-d2 (fetch)
origin  git@github.com:vieitesss/k8s-d2.git (push)
origin  git@git.vieitesss.eu:vieitesss.eu/k8s-d2 (push)
So, from my Mac, GitHub is still the fetch source, and the tunnel-backed Tangled endpoint becomes the second push target.
Final workflow
After all of that, the daily workflow is very simple:
1
2
git pull
git push
git pull still talks to GitHub.
git push sends the changes to:
- GitHub.
- My Knot running on the Raspberry Pi.
That was exactly what I wanted.
I still keep GitHub as the main place where I read and pull code, but now I also have a self-hosted copy receiving my pushes automatically.
One small detail worth knowing is that if one of the push targets fails, the push command will fail too. I am fine with that, because I want to know immediately if my self-hosted copy is down. If you do not want that behavior, you may prefer using a second remote instead of multiple pushurl entries.
Conclusion
This is not the simplest Git setup I have ever built, but it is one of the most satisfying ones.
I get the convenience of GitHub, I keep my normal workflow, and at the same time I have Tangled running at home on my Raspberry Pi as an extra destination for my repositories.
For me, this is a very nice middle ground between the cloud and self-hosting. I am not replacing GitHub, but I am no longer relying on it as the only place where my repositories live.
If you are curious about Tangled and you already have a Raspberry Pi around, I think this is a very fun setup to try.